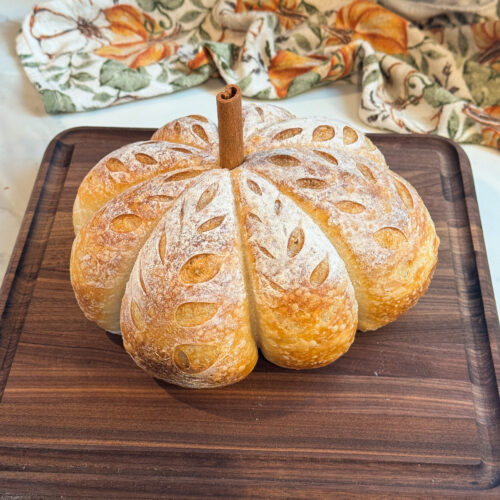
Pumpkin Shaped Sourdough Bread
Pumpkin shaped sourdough bread made with the same foolproof sourdough recipe, shaped into a round boule, and tied off with kitchen twine in eight sections before the final proof so it bakes into the most beautiful pumpkin shape with defined ridges all the way around. A cinnamon stick pressed into the center right after baking becomes the stem. The most impressive and festive fall bake that looks completely extraordinary and requires no special skills beyond your regular sourdough process.
Equipment
- 1 Dutch Oven
- cooking twine
- wicker basket or banneton
- bread lame
Ingredients
For the Levain:
- 14 g active starter
- 68 g warm water
- 68 g bread flour
For the Dough:
- all of the levain
- 290 g warm water
- 13 g coarse sea salt
- 450 g bread flour
Extras:
- cinnamon stick for the stem
Instructions
Day 1
Activate your starter:
- Feed your starter in the afternoon (if you’ve been storing it in the fridge) and before you go to bed, make your levain.
- Make your levain: In a separate jar, combine 14g active starter with 68g warm water and 68g bread flour. Keep on counter covered with a towel overnight to rise.
Day 2
Make your dough:
- In a large mixing bowl, mix 290g warm water, 13g sea salt and all of your levain until salt and starter are dissolved and there are no clumps.
- Add 450g bread flour and stir until dough is shaggy and there are no exposed flour bits. Let rest on counter, covered for 35 min.
- Perform your first set of stretch and folds, sprinkling in chopped rosemary on each fold. Perform 4 sets of stretch and folds allowing the dough to rest 35 min between each round. Here is a video explaining what this looks like: CLICK HERE
- Allow your dough to rest and bulk ferment for 5-8 hours until your dough has increased by 50%. You know it’s ready when you shake your bowl and the dough jiggles and shows bubbles on the top and when pressed, makes an indent and slowly disappears. This will depend on the temperature of your kitchen and humidity where you live. Sometimes I put mine covered in the oven with the light on!
- Once the bulk fermentation is done it’s time to shape. Dump your dough out onto the counter and gently pop any bubbles you see. Stretch the top of the dough up and fold it in to the center of the dough. Do the same with the bottom and then the sides. Flip your dough over and cup your hands around the dough, gently twisting and pulling it down toward you. Let it rest on the counter for 20 min.
Final Shape:
- Flip your dough over so the seam is up. Stretch your dough into a chubby rectangle. Stretch the top of the dough up and out and then bring it to the center of the dough. Repeat with all 4 sides. Flip dough over and cup your hands around it, pulling it down and towards you while turning counter clockwise like before. Flip the dough upside down into a wicker basket or banneton (seam side up) and gently pinch the seam closed. Cover with a towel or plastic (I like using a shower cap) and refrigerate overnight for 12-36 hours for the final fermentation.
Day 3
- Preheat your oven to 500F with your dutch oven inside for 30 min minimum. (45-1 hour is ideal)
- Cut 4 pieces of cooking twine about 18" long.
- Arrange the twine on a floured surface or your silicone bread sling making a cross with two pieces and then an "x" with the other two. The strings should resemble a star.
- Flip your dough out onto the floured surface or silicone bread sling (seam side down) on top of the strings (ideally with the center of the loaf in the center of your midpoint)
- Bring opposite ends of the strings up and around the dough, tying a knot in the middle and trimming the extra. You should have 8 sections after completing this.
- Using a bread lame or sharp knife, score your dough. I like to make alternating diagonal slashes through each of the 8 sections.
- Transfer your loaf to your dutch oven and bake with the lid on for 15 min.
- Take the lid off and lower the temperature to 450F and bake for another 20 min or until golden brown.
- Remove loaf from the dutch oven and let rest until completely cooled on a rack. (this step is super important! wait until the bread has fully cooled, 2-3 hours before slicing.)
- Cut a small hole in the top of the loaf and press a cinnamon stick in for the stem.
- Enjoy! (Store in a bread bag or box for up to 1 week.)